Gravatar is a fantastic tool that allows blog authors and commentators to have their avatar appear consistently across websites all over the internet without having to manually upload it each and every time. However, not everyone wants to use Gravatar or even knows what it is. I often have clients that start writing blog posts but then can’t figure out how to set their profile pictures and get frustrated. Sometimes they aren’t even the ones doing the writing, someone else is doing it for them and publishing it for them. In either case, they want to be able to upload their own WordPress profile picture without using Gravatar.
Sometimes I need to be able to set up their profile picture for the client. Gravatar just doesn’t work in this scenario and WordPress doesn’t give you any other option. Forcing you to use Gravatar for profile pictures is potentially one of the most frustrating aspects of WordPress.
Fortunately, there are ways to override the default WordPress profile picture functionality. Some of them are very simple, lightweight plugins, like Simple Local Avatars, and some are much more complex with detailed profile and community management systems, like ProfilePress. Chances are, if you are like me and just want a simple way to update user profile pictures on individual sites, then I’d suggest something like ProfilePress is way overkill and you are better with a plugin that does exactly what you want and nothing else.
Let’s look at two of my favourite plugins to allow your WordPress users to upload their own profile pictures without using Gravatar and how to set them up: Simple Local Avatars and WP User Avatars.
For this guide, I have deployed a dev server instantly with Cloudways to demonstrate the process for each plugin. Cloudways is one of my favourite WordPress web hosts and saves me a lot of time!
Simple Local Avatars
Why I like Simple Local Avatars
Simple Local Avatars has a large installation base and is updated relatively frequently. These are both signs of an active plugin community. Lots of installations mean more potential development volunteers and more motivation for the current development team to keep the plugin up to date, secure, and user friendly.
Otherwise, Simple Local Avatars is a lightweight plugin that does exactly what we want. It lets registered users upload their own profile pictures without having to use Gravatar. For those users who do want to use Gravatar, that functionality is retained and the two options work seamlessly together in the familiar WordPress interface.
As awesome as Simple Local Avatars is, there are a couple of caveats.
First, Simple Local Avatars leaves the default Gravatar settings on the profile edit screen in their standard location and adds the new profile picture settings to the end of the profile. This works fine but can be a little confusing for users as the two avatar settings may actually be separated by other options and they may not even see the local upload option if they don’t screen all the way to the end of the profile page.
Second, Simple Local Avatars uses the standard media library for image management. This keeps things really simple, but it does mean that any users who are able to upload their own pictures are also able to access the pictures in your media library. This is perfectly fine when you are just managing avatars for a few people who work on your website. However, this should be used with care if you are using a site that allows user registrations like an e-commerce store, community site, or something else. I’d suggest something with more capability in this scenario, like ProfilePress.
How to install & configure Simple Local Avatars
First up, like installing any plugin, let’s go to the “Plugins” menu item and click “Add New“.
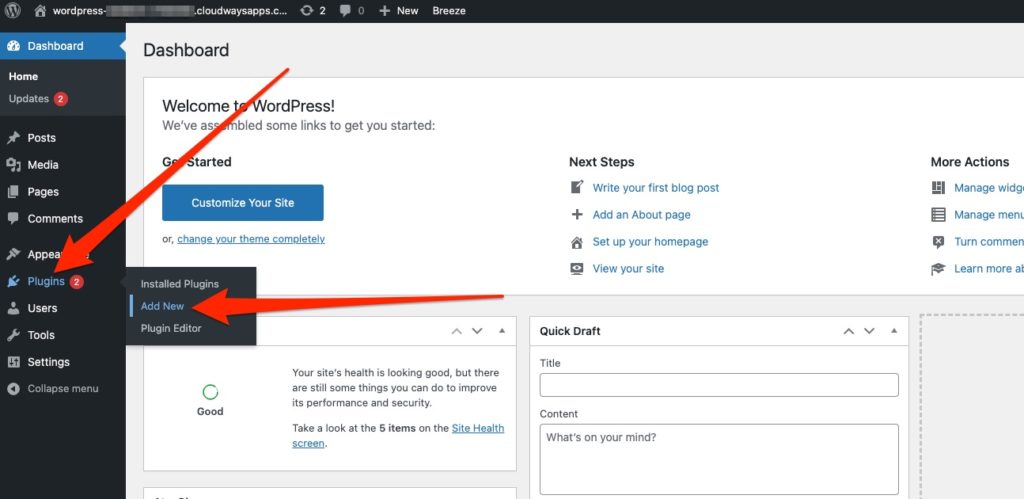
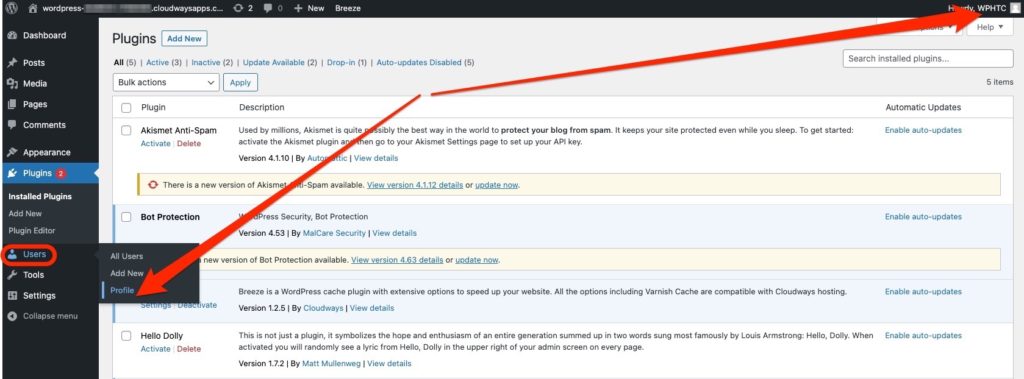
In the search box, search for “Simple Local Avatars” and it should be the first result. in the list. Click the “Install Now” button.
Once the installation is complete, click the “Activate” button.
That’s it, installation complete. There is no configuration necessary. Your registered users can now upload their own profile image from the profile edit screen. If you do want to do some configuration of the plugin, there are two options available in the “Settings” > “Discussion” menu item under the “Avatars” heading.
The two options are simple checkboxes and they are fairly self-explanatory.
The first, “Local Avatars Only” will disable Gravatar except for default avatars.
The second option, “Local Upload Permissions” will restrict the ability to upload custom avatars to only users who have file upload capabilities, that is users who have an “Author” or higher role.
This second option is perhaps the most important because Simple Local Avatars uses the media library for profile pictures. This means that users can browse the media library to select their picture, as well as upload one. You might not want to allow this for just anyone.
How to use Simple Local Avatars
Navigate to the profile edit screen. This will be something like yoursite.com/wp-admin/profile.php – You can get there via the “Users” menu and the “Profile” link or by clicking on your name in the top-right of the WordPress dashboard.
Scroll down to the “Avatar” section that has been added to the end of the profile edit screen. Note, this is AFTER the default profile picture setting shown in the “About Yourself” section.
Click the “Choose from Media Library” button to open your website media library. From there, you can select any images that have already been uploaded or upload a new image.
You can also set the rating for your profile picture. Note, by default only profile pictures with a G rating can be set. If you wish to change this, it needs to be changed in the “Discussion Settings” page under the “Maximum Rating” option.
Once you have set your avatar, make sure to scroll to the end of the screen and click the blue “Save” button.
You can edit the avatars of your users the same way by going into your user list and editing the profile of the user you wish to set an avatar for.
That’s it! Nice and easy.
WP User Avatars
Why I like WP User Avatars
WP User Avatars is another super simple plugin for allowing your users to upload their own profile images without using Gravatar. Its install base is not quite as big as Simple Local Avatars, but it is still one of the more popular options without going into something as heavy-duty as ProfilePress. It’s more than enough active installations for me to be ok with using it, especially combined with the reasonably frequent updates.
I particularly like that WP User Avatars is actually simpler for an end-user. By removing the default avatar settings from the user profile and floating the new settings to the top of the page, they are hard to miss and can’t be confused with those default options.
I also like that WP User Avatars gives you a bit more fine-grained control over what user roles have access to uploading their own profile pictures without using Gravatar.
WP User Avatars does still allow Gravatar to be the default source for users who don’t upload their own picture which is also great.
The only real caveat I see with WP User Gravatars is just that use of the default media library for image management. It’s great when all your users should have access. However, not so great if you want to allow your customers or subscribers to use their own images. You probably don’t want them to have permission to get into your media library. Of course, you can prevent your site users from using custom profile pictures with the permission settings, but that might defeat the purpose of giving your community the ability to set their own pictures without using Gravatar. It just comes down to your end goals.
For a more complex profile management system to suit a community-type site, ProfilePress may be a better choice.
How to install & configure WP User Avatars
Just like installing Simple Local Avatars, let’s go to the “Plugins” menu item and click “Add New“.
In the search box, search for “WP User Avatars” and it should be near the top of the results. Click the “Install Now” button.
Once the installation is complete, click the “Activate” button.
That’s it, installation complete. There is no configuration necessary for WP User Avatars either. Your registered users can now upload their own profile image from the profile edit screen. If you do want to do some configuration of the plugin, there are, once again, just two options available in the “Settings” > “Discussion” menu item under the “Avatars” heading.
The two options are also very straightforward.
The first, “Allowed Roles” gives you the ability to restrict which roles can upload their own profile images. This is important because like Simple Local Avatars, WP User Avatars also uses the media library, so you are giving media library access to all the allowed roles. Depending on your site, you might not want to allow that. I would suggest that perhaps it should only be authors and higher for most websites.
The second option, “Block Gravatar” will stop the website from communicating with Gravatar, effectively disabling the built-in Gravatar functionality.
How to use WP User Avatars
Navigate to the profile edit screen using the “Users” menu and the “Profile” link or by clicking on your name in the top-right of the WordPress dashboard.
The “Avatar” section has been moved to the top-right of the profile edit screen on desktop size screens. It floats down to the bottom of the screen on mobile. The default avatar settings are removed.
Click the “Choose file” button to select an image from your device, or click the “Choose from Media” button to open your website media library. From there, you can select any images that have already been uploaded or upload a new image.
Once you are done, click the “Update Profile” button.
The profile picture rating option has been removed in the desktop view, but it is still there on mobile size screens. Note, by default only profile pictures with a G rating can be set. If you wish to change this, it needs to be changed in the “Discussion Settings” page under the “Maximum Rating” option.
That’s it! You can also set the profile image for your users by editing their profiles as an admin.